Knit binding
Knit binding is a general term for a type of finish (typically) found on the neck or arm opening of T-shirts and other knitwear.
There's two varieties of this finish, a knit band, and actual knit binding.
Knit band
Knit band is what you typically find at the neck opening of your T-shirt. It's a strip of fabric that is folded double and attached to the edge of the garment.
This leaves an unfinished edge on the inside that is often sewn down by edge-stitching around the knit band.

A Creative Commons pictures by Support Tattoos and Piercings at Work on Flickr
Knit binding
Real knit binding acts more like classic bias binding, in that it is wrapped around the fabric, rather than extend from it.
The raw edge of the garment is inserted between the folded knit binding, which is edge-stitched down. This is often done with a coverlock machine, thereby neatly finishing the inside.

Style vs function
A knit band is more common, and is what you typically find on T-shirt necklines. It's the more decorative option.
A knit binding is less common, but often used on undershirts (as in, underwear). It's the more functional option.
Another way to distinguish them is this: Think about what happens when you decide to widen the knit binding/band.
On a T-shirt, widening the band at the neck will make the neck opening smaller. If you want a wider band, you will have to cut a larger hole in your T-shirt.
On an undershirt, if you want the knitwear binding at the neck to be wider, it will not make the neck opening smaller. Instead, the binding will simply lay further over the undershirt main fabric.
Why knitwear binding requires stretch
Whether you're using a knit band or a knit binding finish, you are going to have to stretch your binding fabric for good results. That is, assuming you're not sewing a straight seam. Here's why:
Straight: life on easy mode

On a straight seam, you can simply attach your binding/band. Your fabric and binding have the same length, so everything will be fine.
The most likely scenario where you will encounter this is on the (short) sleeves of a T-shirt. Although the knit band wraps around your arm, from a pattern perspective (as in, when the fabric is still flat) it's a straight seam.
Uniformly curved: uniform stretch
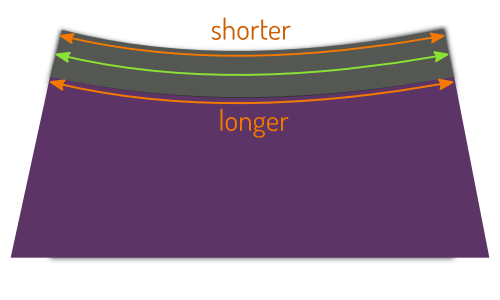
On a curved seam, like an neck opening, things get a little more complicated. That is because the outer edge and the inner edge of your binding will have a different length.
No stretch, and things won't lie flat (aka gape)
If you simply sew the binding to the fabric, things will be fine at the outer edge of your binding. But the inner edge is shorter, and your binding fabric will be pushed together. The tension that this creates will make it rise, and your binding will not lie flat against your skin.
Stretch it just right, and it will look great
To fix this issue, you need to stretch your knit binding (and not the fabric) while attaching your binding. If you do it right, the outer edge will be stretched open a bit, while the inner edge will nicely fill out your curve and everything will lie flat.
If you stretch too much, things will wrinkle
Stretch your binding too much, and it will spring back too far, causing the main fabric to wrinkle.
Real life: variable stretch
Straight seams exist, and although I've never come across one, maybe uniformly curved seams exist too. But more often than not, the curvature of your seam will vary.
On a typical T-shirt neckline, the curve at the back of your neck is different from the front, and there's probably a somewhat tighter bend behind your shoulder seam.
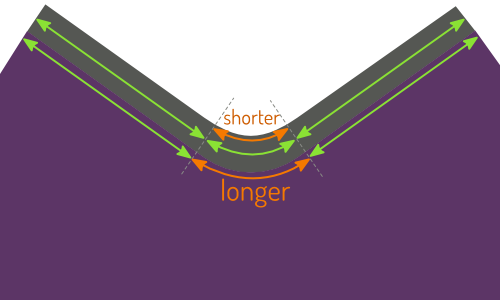
On a slight curve, the difference between the inner and outer edge is not so big, and a little bit of stretch is all you need. But on a tighter curve, the difference between the inner and outer edge of your binding will be more significant. And you'll need more stretch to accommodate for that.
So as you follow your seam, and it curves around necklines, or shoulders, or design features, you will have to adapt the amount of stretch to the situation.
You cannot calculate the length of your knit binding
I am not saying it is theoretically impossible. But I am saying that it is practically impossible.
The length of your knit binding depends on the amount it needs to be stretched. This depends on the curves you have to follow, and the width of the binding, not to mention the strength of its stretchiness. There's just too many parameters to take into account to calculate your binding length accurately.
Do not do pre-cut your knit binding
There are a bunch of tutorials out on the internet that show you how to sew on knit binding. Many of those suggest something like make the neck binding 90% of the length of the seam you are attaching it to (the percentage varies).
This idea is that you cut your binding, join its edges, and then sew it in the opening. That is (in my opinion) no good.
Avoid multiple seams in your knit binding
An alternative approach to sidestep the length issue is to attach the binding before you close the opening your binding goes in. For example, on a T-shirt you close one shoulder seam, attach the binding, then close the second shoulder seam.
Obviously, that means your shoulder seam will cut through your binding which is a big no no in my book.
Instead, follow these steps
Apply your knit binding as explained in the Aaron documentation